
A sharp knife is safer than a dull one. It goes where you aim it instead of slipping off an onion skin. The good news is that learning how to sharpen a knife at home takes no special skill, and the tools start at around ₹300.
This guide covers four methods, from the whetstone to a ceramic mug from your kitchen shelf, plus the right angle for your knife, which grit to use and how to test the edge.
Affiliate disclosure: Some links on this page are Amazon.in affiliate links. If you buy through them, I may earn a small commission at no extra cost to you. Read the disclosure.
Short Answer: How to Sharpen a Knife
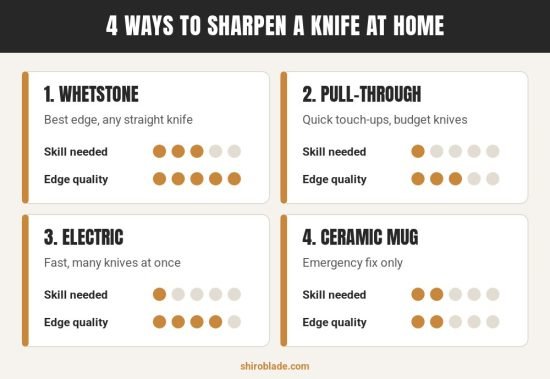
Hold the knife at a steady 15° to 20° angle and grind each side of the edge on a sharpening stone or sharpener until a small burr (a thin ridge of metal) forms along the opposite side. Then switch sides, finish with lighter strokes on a finer surface, rinse, dry and test the edge on paper or a tomato.
| Method | Best for | Skill | Edge quality |
|---|---|---|---|
|
Whetstone |
Any straight-edge knife, best results |
Medium |
Excellent |
|
Pull-through sharpener |
Quick touch-ups on budget knives |
Low |
Good |
|
Electric sharpener |
Busy kitchens, many knives |
Low |
Good to very good |
|
Ceramic mug (emergency) |
When you have no sharpener |
Medium |
Fair |
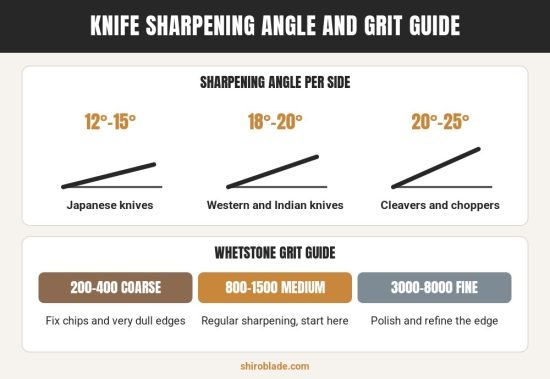
Before You Start: Angle and Grit
Two numbers decide how well your knife will cut: the edge angle and the grit of the sharpening surface. Get these right and every method below works better.
Choose the Right Sharpening Angle
| Knife type | Angle per side | Examples |
|---|---|---|
|
Japanese knives |
12° to 15° |
Gyuto (Japanese chef knife), Santoku, Nakiri, Damascus VG10 knives |
|
Western and Indian kitchen knives |
18° to 20° |
German chef knives, Victorinox, Pigeon, Prestige, most budget knives |
|
Heavy-duty knives |
20° to 25° |
Cleavers, meat choppers, coconut knives |
If you don’t know your knife’s angle, use 20°. It is a safe, durable angle for most knives sold in India. Our guide to Japanese kitchen knife types explains why Japanese blades use a thinner edge.
Choose the Right Grit
| Grit | Type | Use it for |
|---|---|---|
|
200 to 400 |
Coarse |
Repairing chips and very dull edges |
|
800 to 1500 |
Medium |
Regular sharpening (start here) |
|
3000 to 8000 |
Fine |
Polishing and refining the edge |
Method 1: How to Sharpen a Knife with a Whetstone
A sharpening stone (whetstone) gives the best edge and lasts for years. A 1000/6000 combination stone covers almost every home kitchen. We have a full step-by-step guide to using a knife sharpening stone; here is the short version.
1. Soak and Secure the Stone
Soak a water stone for 10 to 15 minutes until it stops releasing bubbles (splash-and-go stones only need a splash). Place it on its rubber base or a wet cloth so it cannot slide.
2. Set the Angle
Lay the blade on the stone with the edge facing away from you and raise the spine to 15° or 20°. Colour the edge bevel with a permanent marker first: if your strokes remove the ink evenly, your angle is right.
3. Sharpen Until a Burr Forms
With two or three fingers pressing lightly on the flat of the blade, push the knife across the stone in sweeping strokes from heel to tip. After 10 to 20 strokes, run your thumb gently across (never along) the opposite side of the edge. A slight rough ridge, called a burr, tells you that side is done.
4. Flip and Repeat
Turn the knife over and repeat on the other side at the same angle until the burr moves back to the first side.
5. Refine on the Fine Side
Flip the stone to the fine grit and make 5 to 10 light, alternating strokes per side. Finish with a few strokes on a honing rod or a leather strop to remove the last of the burr.
Method 2: How to Sharpen a Knife with a Pull-Through Sharpener
A pull-through sharpener has preset slots, so the angle is fixed for you. It is the easiest way to sharpen a knife at home, but it removes more metal than a stone and the angle may not match Japanese knives.
- Place the sharpener on a flat counter and hold the handle firmly.
- Set the heel of the blade in the coarse slot and pull the knife towards you in a straight line with light, even pressure. Do 3 to 5 pulls.
- Move to the fine slot and do 5 to 8 lighter pulls.
- Wipe the blade to remove metal dust and test it.
Never saw back and forth or press hard; that tears the edge. You can compare models in our list of the best knife sharpeners in India.
Method 3: How to Sharpen a Knife with an Electric Sharpener
Electric sharpeners use motor-driven abrasive wheels in two or three stages. They are fast and consistent, which helps if you sharpen many knives.
- Switch it on and start with the coarse stage only if the knife is very dull.
- Pull the blade through each slot slowly, about 3 to 4 seconds for an 8-inch blade, without pushing down.
- Alternate slots for each side as the manual says, then finish on the honing stage.
Electric sharpeners remove metal quickly. Skip the coarse stage for routine sharpening, and avoid them for expensive Japanese or Damascus knives. Our guide to the 7 types of knife sharpeners compares electric, manual and stone options side by side.
Method 4: How to Sharpen a Knife Without a Sharpener (Ceramic Mug Trick)
The unglazed ring on the bottom of a ceramic mug or bowl is rough enough to act like a fine stone. It is an emergency fix, not a replacement for a proper sharpener.
- Turn a ceramic mug upside down on a towel.
- Hold the knife at 15° to 20° and draw the edge across the rough ring from heel to tip, 10 to 15 times per side, alternating sides.
- Wipe the grey metal marks off the mug and the blade, then test.
The back of another knife, a car window edge or a brick are often suggested online. Skip them; they damage the edge more than they help.
How to Test if Your Knife Is Sharp
- Paper test: hold a sheet of printer paper by one corner and slice downward. A sharp edge cuts cleanly without tearing.
- Tomato test: rest the edge on a ripe tomato. It should bite into the skin with almost no pressure.
- Onion test: a sharp knife slices onion layers without crushing them, which also means fewer tears.
- Light test: hold the edge under a light and look straight down. Shiny spots show dull or rolled sections that need more work.
How to Sharpen Different Types of Knives
| Knife | How to sharpen it |
|---|---|
|
Chef knife |
Whetstone or pull-through at 15° to 20°; work the curved tip by lifting the handle slightly |
|
Santoku or Nakiri |
Whetstone at 12° to 15° per side; a few traditional ones are single-bevel, so check the maker’s guide |
|
Paring knife |
Short strokes on a stone or the fine slot of a pull-through |
|
Bread knife (serrated) |
A thin tapered rod, one scallop at a time; do not use a flat stone or pull-through |
|
Cleaver |
Coarse then medium stone at 20° to 25° for a tough edge |
|
Ceramic knife |
Diamond stone or a sharpener made for ceramic blades only |
Not sure what each knife is for? See our guide to the 15 types of kitchen knives.
Common Knife Sharpening Mistakes
- Pressing too hard: light pressure gives a cleaner edge and protects thin blades.
- Skipping the burr check: if you switch sides before a burr forms, the edge never fully meets.
- Wobbling the angle: keep your wrist locked and move from the shoulder.
- Sharpening too often: hone first. Our guide on honing vs sharpening explains when each is needed.
- Leaving the knife wet: rinse and dry it straight after sharpening, as fresh steel spots easily.
How Often Should You Sharpen a Knife?
For daily Indian home cooking, sharpen every 2 to 3 months and hone a few times a week in between. Heavy use on meat, pumpkin or coconut may need sharpening every month. Let the tomato test decide rather than a fixed date. Store knives in a knife stand instead of a drawer so the edges don’t knock against each other.
Conclusion
Learning how to sharpen a knife comes down to a steady angle, light pressure and checking for the burr. A whetstone gives the best edge, a pull-through sharpener is the easiest, and a ceramic mug will save you in an emergency. Pick one method, practise on an old knife first, and your everyday knives will cut like new. To choose a sharpener for your budget, see our list of the best knife sharpeners in India.
FAQs
What is the best way to sharpen a knife at home?
A 1000/6000 grit whetstone gives the best edge for most home kitchens. If you want something quicker and easier, a two-stage pull-through sharpener works well for budget and Western knives.
What angle should I sharpen my kitchen knife at?
Use 15° per side for Japanese knives and 18° to 20° per side for Western and Indian kitchen knives. If you are not sure, 20° is a safe choice.
Can I sharpen a knife without a sharpener?
Yes. The unglazed ring on the bottom of a ceramic mug works as an emergency stone. Hold the knife at 15° to 20° and draw it across the ring 10 to 15 times per side.
How do I know when my knife needs sharpening?
If it slips on tomato skin or crushes onions even after honing, it needs sharpening. Shiny spots on the edge under a light also show a worn edge.
Is it better to sharpen a knife wet or dry?
Water stones must be used wet; oil stones use honing oil; diamond plates can be used with a little water. Pull-through and electric sharpeners are used dry unless the manual says otherwise.
Can I sharpen a serrated bread knife?
Yes, with a thin tapered sharpening rod. Sharpen each scallop on the bevelled side only, then remove the burr on the flat side with a few light strokes.

Indian knife collector with a deep respect for Japanese knife making. What began as an interest in Damascus patterns grew into a focused study of Japanese knives from Sakai and Seki. Through Shiroblade, I share simple guides on buying, using, and caring for knives, helping readers understand real craftsmanship beyond looks.


Pingback: How to Remove Rust from Knives: 5 Safe Methods - ShiroBlade